Table of Contents
Query user log
- User log inquiry service is available for the staff (@mx), students (@oz,@m98-@m106, etc.), and departments (@my) email systems under our management as of 2017/04/21, so that users can understand the usage of their e-mail account.
- Four types of records are currently available for inquiry, including account management records (such as: change password), failed login records, successful login records, and SMTP sending mail records.
- Users who suspect any abnormal situations with their account may use this service to observe if there are any successful login records from unknown IP addresses to determine if their password was stolen. If your password was stolen, please change your password immediately.
 Note: Inquiry results may be incorrect due to defective data or program. If you have any questions, please contact us at opr
  net.nthu.edu.tw. Thank you!
- Please see the following section for inquiry procedures:
1. Login from Academic Information System
- Enter your AIS password.
- If you forgot your AIS password, please click “Forgot your password?” below “login” on the page of AIS system for help.
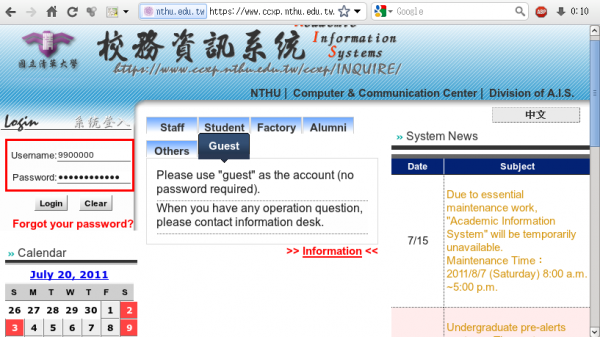
- Select “Computer and Communication Center Services” first, and then “Division of Network Systems”.
- Click the URL “Division of Network Systems” on the right frame, and then your browser will be redirected to the service portal of Division of Network Systems


Failed to redirect to the service portal
- If the error message like “cannot get checksum or expired…” appears, it means that the URL is expired due to over the valid period of 2 minutes after its generation. Please click the “Division of Network Systems” on the left menu (or login AIS again) to generate another valid URL.
- If the error message like “IP mismatch…” appears, it means that your IP address connecting to the portal differs from that to the AIS. Please keep your IP address always the same while performing manipulation.
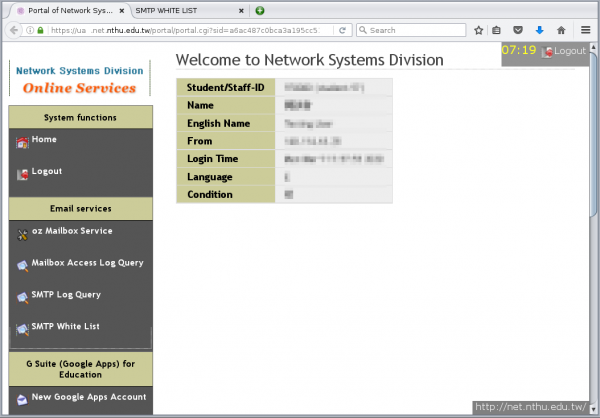
Succeed in redirecting to the service portal
- If like the below window shows, it means that you successfully connect to the service portal of Division of Network Systems (the URL is like https://ua.net.nthu.edu.tw/portal/...)

2. Select account record
- Select “Mailbox Service” according to which kind of mailbox you own, and then “Query user log”
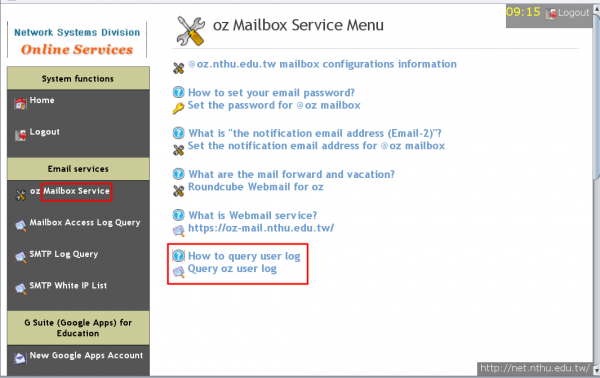
- Select “Log type”
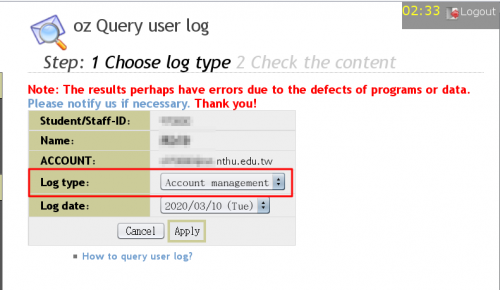


Account management records
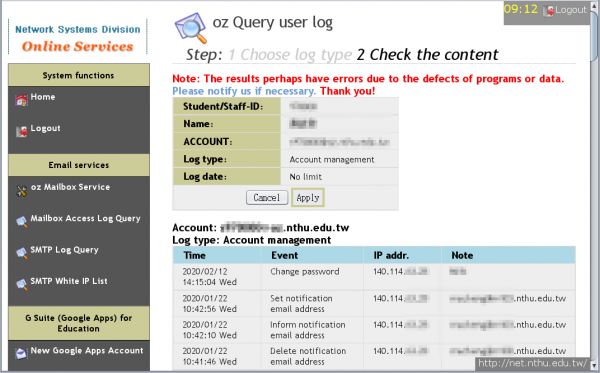
- Account management records include information on account creation and password change.
- In “Log type,” select “Account management” and click on “Apply.”
- Account management logs appear in chronological order, such as: the time and IP address during account creation and password change.

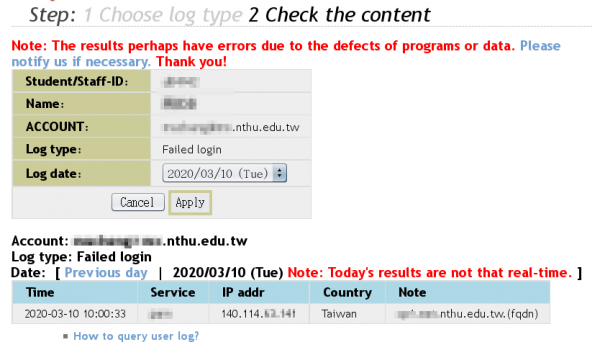
Failed login records
- Only records within the past 30 days may be accessed.
- In “Log type,” select “Failed login,” “Log date,” and then click on “Apply.”
- Logs of failed logins that day will appear, including the time, connection service, source IP address, and country.
- “Previous day” or “Next day” can be used to change the log date.

Successful login records
- Only records within the past 30 days may be accessed.
- In “Log type,” select “Successful login,” “Log date,” and then click on “Apply.”
- Logs of successful logins that day will appear, including the time, connection service, source IP address, and country.
- “Previous day” or “Next day” can be used to change the log date.


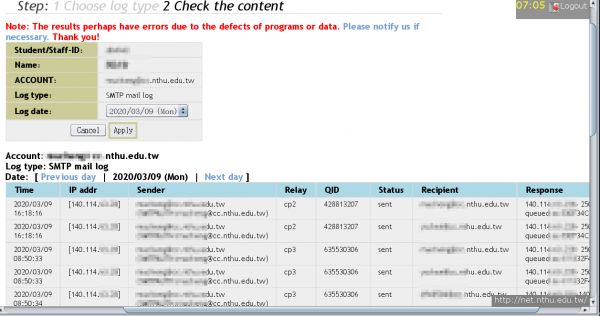
SMTP mail log
- Only records within the past 30 days may be accessed.
- SMTP mail log only includes those mails sent via our SMTP servers smtp.net.nthu.edu.tw or smtpauth.net.nthu.edu.tw.
- In “Log type,” select “SMTP mail log”, select “Log date,” and the click on “Apply.”
- SMTP mail logs that day will appear, including time, source IP address, sender, relay server, status, recipient, and response.
- “Previous day” or “Next day” can be used to change the log date.